Interactive Segmentation and Measurement
There are many ways to segment features in Fiji. This tutorial illustrates and interactive tool that can make this process simpler. I will use the blobs sample image (File>Open Samples>Blobs) as an example, but any two dimensional image should work. For a multi-channel image the tool will try to combine the channels before segmenting but you can opt out and it will segment the selected channel. I typically use the Fiji search bar or the command finder (Plugins>Utilities>find commands) to find plugins instead of the menus. As a result I won't list the full plugin menu paths here.
Background Subtraction:
Note that it is good to subtract the background off of your image prior to measurement. If you don't do this you will end up with higher intensity levels than you expect. There are many ways to subtract background but I prefer selecting the background region with a rectangle and running "roi average subtract jru v1". That plugin simply subtracts the average of the selected region from each channel. Note that the resulting image is 32-bit floating point. That way the negative values are preserved in the subtracted image. If you use a subtraction that results in an integer image type, negative values will clipped at 0 biasing the measurement.
Getting Started:
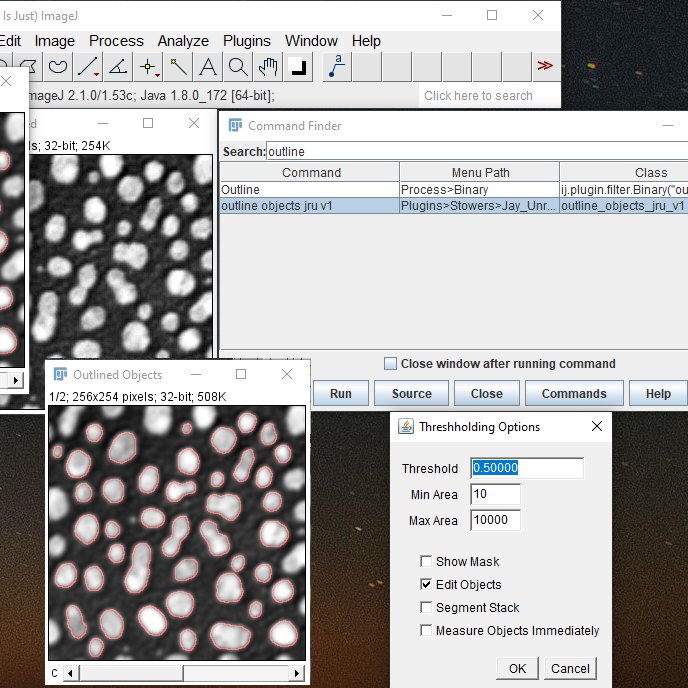
To start, run "outline object jru v1". The plugin will ask about smoothing. In general it is a good idea to smooth images prior to segmentation--that way the edges of objects can be found reliably. But you generally don't want to smooth your measurement image as it can bias the measurements of small bright objects. The way this plugin works, the smoothing is performed in the segmentation step but measurements can still be done on the original image. For the background subtracted blobs image, a smooth standard deviation of 1 works well. The next dialog box is an interactive thresholding tool. The threshold value is a fraction of the maximum intensity in the image. The best value for this depends on how heterogeneous the object brightnesses are in your image but a value between 0.5 and 0.25 usually works well. You can also filter objects by size. If you have large images you will need to increase the Max Area value to accomodate them. The Min Area value can be used to eliminate small features in your image that don't represent real signal. This image is a composite image with the second channel showing the selection. If you have a hard time seeing the selection, you can check the "Show Mask" box to fill it in. Once you are happy with the outlines, you can do several things. If you check "Measure Objects Immediately" you can select which image you want to measure (perhaps the subtracted image) and it will perform the measurements. If you select "Segment Stack" the plugin will segmented your current 5D image with the same method you have used for the selected image and return a mask stack. If you select "Edit Objects" the plugin will send you to an interactive tool to improve your segmentation or do more detailed manipulations.
Editing the Objects:
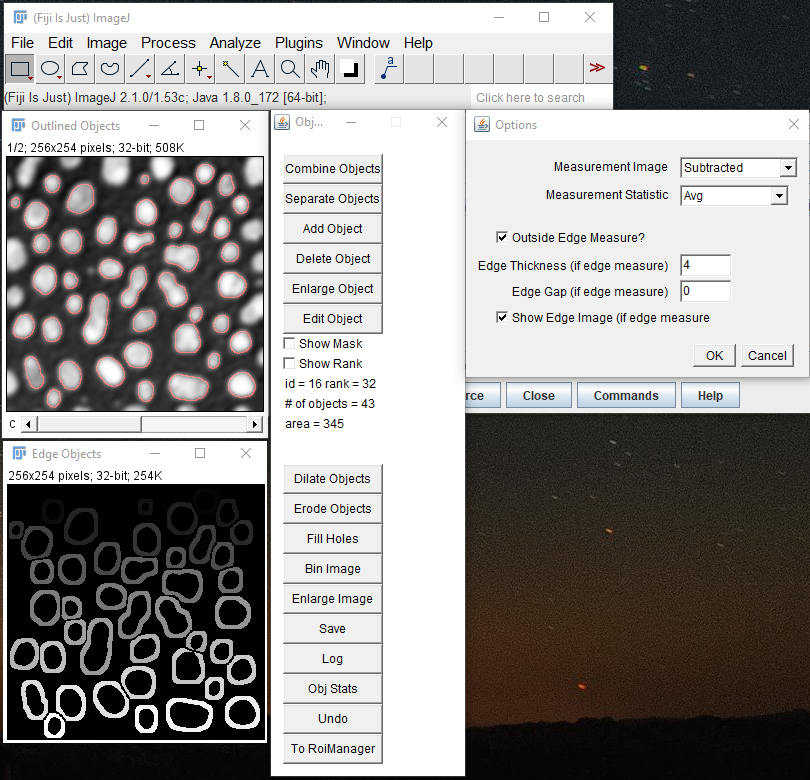
The next dialog allows you to modify the segmentation and perform more nuanced measurements. Again there is the Show Mask option. You can also label the rank of the objects on the image. This can be a bit hard to see. Finally you can put selections in the Roi Manager and do things like add objects, separate objects, combine objects, enlarge objects, and delete objects. Below the Show Rank part of the dialog there are things you can do to the entire image. Dilate expands all of the masks while preventing them from merging. Erode shrinks the masks. You can also shrink the image ("Bin Image") and enlarge it while not losing the masks. Note that the Undo option is only good for reversing a single processing step. Save outputs a tiff image of the segmentation. You can open it like any other tiff and run the plugin "edit objects jru v1" to get back to this dialog.
Measurements:
The Obj Stats button simply performs measurements on any selected image in every channel given the current masked objects. One thing to note is the outside edge measure option. If this is selected a border around each object is measured, rather than the object itself. This border is created by dilation and is prevented from overlapping neighboring objects. This can be useful for measuring cytoplasmic intensity relative to nuclear intensity for example. It is a good idea to output the edge image so you can see what was measured.
Alternatives:
The major limitation of this workflow is that it is not automatable with macros. Most of these steps can be done by hand in a macro recordable way. For example, smoothing is Process>Filters>Gaussian Blur. Fractional intensity thresholding is "thresh 3D fraction max jru v1". Filtering based on size is "filter objects jru v1". Object measurement is "object measure jru v1" which gives options for outside edge measurement ("Measure Circ").